This post will be very detailed in written discription, and pictures because it is part of my last assignment for school.
It's hard to believe but this is my last school project that I will do in my two years of study as a " artisan" at Gradia School. I thought long and hard on what I wanted to do for this final project.
When I couldn't come up with idea's I then asked around for idea's from my friends and family. Our son and his wife volunteered and asked if I could make them three pictures for their new home .. they wanted these pictures for their living room wall.
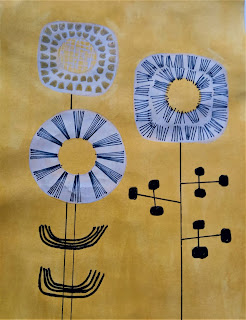
Now that I had a customer, we had to decide what style they were looking at. After many many emails, and sending pictures collected off the internet I finally had a good idea of what they were looking for. The style they most liked was " scandinavian folk art", as our son was finnish this only made sense.
They sent me three pictures that they liked, and I went about redesigning these. I sent them four sample pictures for each picture. Once they chose the sample picture, we had to decided what technique they wanted these to be made in. They chose the Silk Screening process. I had done this technique at school but I had not used any colour other than black. So this was going to be a challenge for me. When using colours you have to have different screens for each colour design.

This is a drawn copy of the original picture that they chose.
Flower # 1
This is the drawn picture of the next print they decided they liked.
Picture # 2
This is the last picture that they chose to be in their collection of fabric printed pictures.
Flower # 3
Now that I had an good idea of what the design is going to be like, I now have to go about changing and modifying the pictures to be more into the " scandinavian folk art" design.
I made four pictures for each of the three flowers they had chosen. After I had made all these pictures for them to chose from they finally chose the three pictures which they wanted me to make the Silk Screen Art pictures from.
In the picture to your right you can see the picture that they chose. They had chose the picture on the top of the picture, but in my mind it still was not the " scandinavian style that I wanted for them". I submitted the bottom picture to them, and they absolutely loved it.
In this next picture, they chose the picture one the top of the left hand photo. Once again, I asked if I could make the picture more " scandinavian". They loved the bottom picture that I showed them.
In the right hand top picture you can see the design that they chose. I again changed it to be more in line to the "scandinavian folk art" style. ( which is called "seamless vector pattern" ). They were very pleased and happy with the changes I had made.
Here is another screen prepared for my next picture.
There are many steps involved in making and planning the pictures, here are but a few of the steps.
If you look closely you can see that my picture of the flower is on three different stations of the carousel.
At this station of the carousel I am applying top paint. It is the black paint that defines the flower.
Here are first three final print pictures that I printed on my chosen fabric. I will have to chose the best one of the three.
After my print is finished printing, it needs to be heat treated to seal in the paints. At school we have a huge drying machine which we call the " drying tunnel". Here I am feeding my pictures in the tunnel, the temperature of heat is set at 350C and the fabrics go through 3 times.
In the picture above. The three pictures are completed. I sent these pictures to the customer to finalize and okay. The customer was very happy with the final draft of these.
Here is the completed the first print. I have ironed an interfacing on the back of it to make the fabric stronger, and stays flat. These will be shipped overseas laid flat in a package. ( Unfortunately I cannot frame them here in Finland.)
Print #2a is now completed. A interfacing has also been iron on the back of this picture.
Completed picture #2b . Ironed and interfaced.
Finally # 3 print is completed. Ironed and interfaced.
I am so very happy with how this set of three printed pictures turned out.
These three prints will be packaged and sent overseas for my customer to matte and frame.
Now that this process is done, I am going to have some fun and try different pattern techniques with the designs I made.
To the right you can see that I used a repeated pattern technique for the pillow covers that I am going to send as an gift for my customer. I really like the way these turned out. I have sent pictures of these to my customer and she absolutely LOVED them.
Here is the pattern repeated on the blue upholstery fabric. this pillow size will be 50cm x 50cm
Here is the pattern combination on the blue denim fabric.
This one is my very favorite picture. I am in love with the yellow and black print on this pillow. I wish I could keep it.
Then the fun job of making the pillows. Here you can see the pile I had stacked up of pillows to sew or have been sewed.
The sewed and stuffed pillows are now displayed on our couch. The customer was absolutely thrilled when I sent her pictures of these. She loved them.
I also made a smaller neck rest pillow from leftover fabric print.
This pillow to your right is one of my sample pieces on sheet material. It looked so good, that I decided to make a pillow for myself out of this one.
This is the reverse side of the white pillow from the above picture. These are the sample prints that I have used. I still love the pattern and colour, so I decided that it was good enough for me.
I found more sample pieces in my piles of work, so I decided to make a tote bag with the design on it. You always need tote bags. I think it turned out great.
Above are my four silk screen printed and framed " scandinavian Folk art " pictures.
With this done, I have completed my final project for my school. It has been an interesting journey. I have cried, I have raged, I have rejoiced, I have laughed. I have met and made wonderful new friends that will last a lifetime. I have grown in confidence as a "Artisan". I have tried many new and wonderful crafts that I would love to pursue in the future.
Where will this all take me? Only God know.... but no matter where it is, I know that I will be more knowledgeable, and confident in my work and in myself.
Please keep following me on this blog... I will be continue posting on what is going on in my life, and where all my schooling has taken me.


