Friday, March 20, 2020

NALBINDING

 In this course we had to chose a textile technique.The choices were vast, tating lace, ribbon making, crocheting,embroidery,etc.etc. When I went over the list of things to choose from the one thing that jumped out at me immediately was Nalbinding. I have so long wanted to learn this old technique. My husbands grandfather used to nalbind. I would watch him for hours doing this art, and couldn't figure out how he was doing it. I asked his grandmother how it was done, but she also didnt't know how to begin doing it. She only knew how to continue it once it was started. I asked other family members, if they knew how to do this lost art, but they also didn't know how. I decided then that I will someday learn this lost art, and be the one in the family to continue making these mittens.

 I remember receiving these precious mitts that he had made, and treasured them. The funny thing was that our boys also loved these mitts, and before we moved to Finland they fought over who will get these mitts. I took a pair along on our move to Finland, and thought that maybe here I would learn how to do this lost art. 

So that is the story of why I so.... wanted to learn this art.Anyway, I got a sheets of instructions  for nalbinding from the school. I also was able to borrow the needles to use from our school, but unfortunately none of the teachers remembered how to start this nalbinding technique, so these instructions sheets did not help me much.

 So, I looked off the internet for instructions. Well, I did find instructions but unfortunately because I am a lefty, I couldn't understand how to start the work. For weeks I tried and tried. ( meanwhile, our school shut its doors due to the Corona Virus outbreak.) so, there I was all alone at home trying to figure out this technique. After many many attempts, I finally found a website for left handed people learning nalbinding. Well, after that I was off to the races. 


These are the needles needed for Nalbinding. I used the middle needle, it worked the best for me.


This was my first attempt.. As you can see... it looks like some tangled wool


In the above picture you can slowly see my attempts and progress of nalbinding  from the top left hand picture all the way down to the bottom right hand picture.


In these three pictures you can see that I am growing in confidence with this technique. I have not perfected it yet, but slowly I am getting better and better. In the picture below you can see that  I even attempted a fancy edge for my mitten. It was alot harder to do this than I thought.


                 In this picture to the right you can see that I am getting better at the nalbinding, my stitches are more even.


The bottom of the round bag I made, is still a a bit messy. Nalbinding is rather slow to do, and unfortunately you have to constantly add on the threads, which causes breaks and unevenness in the needling. 


I so.... enjoyed the nailbinding that I decided to make a pair of mittens for myself or give them away to someone.

In the next few pictures you can see  a pair of mittens that I made with the Nalbinding technique. I also dressed the mittens up with some embroidery.

I finished the mittens, and now am adding the embroidered greenery on the mittens.


One the picture to the right you can see that I have started embroidering flowers on the mittens.


 The mittens are now finished. I am very happy with the end result. I can now say that I know how to nalbind.


I only embroidered the top side of the mittens. 

Now who can I give these to. I am not a embroidery kinda gal, and the pink is not my colour either. Someone is going to get a great gi

Tuesday, February 18, 2020

FELT ART PROJECT FOR CUSTOMER

For this course we had to have a customer and make some craft for them. 

One of my classmates had earlier on in the year requested that I make some "felt art" pictures for her of their cottage surroundings.This was the perfect opportunity to now do these pictures.

 She gave me pictures of her cottage and its surroundings, and I started from that. In the pictures below is the a few pictures of the process I went through.


 Above are the original pictures of the landscape that she had wanted for the felted pictures.


This is a sample drawing that I did for her to chose from. Below is another sample for her to chose from.


In this picture I am starting the process of putting my colours of the ground down.

Here I have nearly finished the picture of the cottage surroundings. I really struggle with making rocks and shorelines. It is something that I definitely have to practice more.

I made another picture showing the view from land looking onto the water.

Another felted picture of the cottage area. All of these pictures are not my typical style, but this was what the customer wanted and requested. the customer is always right.

Thursday, January 23, 2020

LOOM WEAVING TECHNIQUES


In this course we were taught different loom weaving techniques. I chose the techniques of  Punapoininta, pitsipoiminta, helmipoiminta, kuvakudos.


 This picture is of helmipoininta. I am not sure what that is in english.

This was an easy technique to do, and it was a lot of fun.

This technique was called " punapoiminta". It was more challenging and needed more thought and planning to go into making this technique. But the end result was very pleasing to the eye.


As you can see as I weave this runner, the pattern is coming out beautifully. I had never woven something like this, so it was a good opportunity to learn this.


This is the sample of "punapoiminta" completed. I really want to try making something like this again.


In this next loom technique it is called "sidontaa"

I enjoyed doing a ryijy on the loom. I found it quick and easy, it just the setting up of the loom that takes a long time.

This sample is now completed. It was easy and fun to make this sample ryijy. 

I have loved learning these different techniques. Hopefully someday I will have a small loom that I can make beautiful linen runners.

Tuesday, January 21, 2020

HAND LOOM WEAVING

 
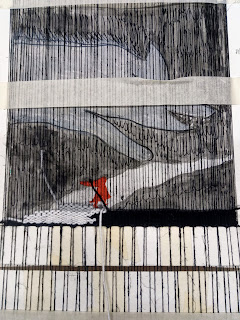
In this last set of loom techniques I chose to do my "Kuvadudos" by using a small hand loom. The picture I chose for this was Little Red riding hood and the big bad wolf. We had instructed by our teachers to make a picture of a "fairy tale". We had an event coming up this fall in Jyväskylä called  "valonkaupunki" in which our school is participating. The theme of this event is going to be fairy tales. So, this picture is going to be shown in this event.


My weaving of Little red riding hood is progressing well.

Now that the picture is complete, I need to add in the birch trees.
I tried a few different methods to add the birch trees, the above picture did not look the way I wanted, so I tried painting trees on fabric, and then sewing them onto the picture. This turned out much better. I love this picture, its scary, but not.


This spring 2021 I was asked by a family member to make a woven wall hanging for them. They told me the colours they want in this wall hanging, and I got to chose the design. In hind sight I should have chosen a richer green colour. In this picture it looks more grey than green.

Wednesday, January 8, 2020

SEWING

When I started this course, I told the teacher that I have sew so much in my life, that I am finally at the stage where I absolutely HATE sewing . She  took that as a challenge.  During the week we were taught handy tips that make sewing more easy and fun.
 
Well.... by the end of the week, I had to admit to the teacher that I actually enjoyed myself. 

The school sewing machines are wonderful to sew on. I just needed a crash course on how to use them.


  I the    pictures above you can see the process of sewing the bag.

Here I am sewing a little shoulder purse for myself. I chose a Marimekko material for my bag. ( I just love the birch look of the fabric)


I sewed a separate pocket for my cell phone,which makes it much more accessible.


My finish Marimekko shoulder bag.


I walk around proudly with the shoulder bag that I made. It turned out fabulous.
 
 
OTHER SEWING PROJECTS 
 
Every Christmas when I put up our Advent Calendar my husband complains that the pockets were not big enough to put " goodies" in them. 

 So, last christmas I decided to make a larger Advent calendar..

The pockets are perfect now. Lots of "goodies" can go in each pocket. Now I just need to decorate the front of the pockets. This will be my evening project this fall.


Tuesday, December 10, 2019

WOOL DYING ( CHEMICAL AND NATURAL)

CHEMICAL DYING
 

This course used alot of mathematical equations to figure out the weight of the materials, and how much dyes you need for the material. Also, there is alot of time spent just sitting and stirring the wood pot, and waiting for the next step to commence. I found out that chemical dying was not my thing. 


Here I used a chemical dye to dye this grey wool.

I used a SUPRALAN RED to get this colour. I accidentlly used the wrong amount of ingredients but the end result was good.


                                                                                                                                                                                                                                                    Here I am in the boiling process of the red wood      


             In this photo the  wool is drying. If you notice the bottom far right hand wool has felted in the process.     


I Also tried different colours, pink, greens,aqua, dark green, olive green, rusts, light olive green, which you will see in the next picture below as well.


In this photo is a brownish blanket that I want to dye red.
We chose the largest pot possible to have the room for the blanket to easy move about, which helps it to absorb as much colour as possible.

The blanket was laid out to dry flat. The colour took really well. ( To be honest we where very sceptical that it would turn out)                                                                                               


NATURAL PLANT DYING 
 
 This course was much more interesting than the chemical dying. This is something that I can do at home as well.  I was really surprised on how well the natural plants gave such wonderful colours to the wool. I boiled yellow Tansy flowers to see what kind of natural dye I would get from them.
 
 
 Preparing Porcini mushrooms for dying


In the first left hand dyed wool, I used the mushroom colour to dye this. Then in the middle picture I had the Tansy flower ( the reason they are two different colours, are one ball was originally white, and the other was a grey). The right hand purple wool was dyed using Saskatoon berries. (these ones as well were dyed using a white wool on the second to last wool, and the last purple wool I used a grey wool).
 

This photo shows the dyed wool using a different lighting.In the middle section of this photo I used Madder root, to dye the orange. then I used the same dyed water and made a lighter orange, and then once more and got the yellowish colour. I was very happy with the end results.

Porcini mushrooms, Tansy, Madder root, and Saskatoon berries make up all these beautiful coloured wools.