In the next course for school we needed to have a customer to make a product for, and I was lucky because I had been approached by a customer who requested that I make for her " four sauna bench towels" and two felted sauna hats.
She had seen a picture I had posted online of a sauna bench pillow that I had made. She loved the picture on it, and wanted that picture to be on the bench towels. Unfortunately due to copyright laws I could not copy and sell the same picture. I explained this to her, and said that if I changed the picture (s) I could then make them for her without breaking any copyright laws.
I had also suggested that I could instead make some bench towels with birch trees ( which are totally my thing) but she said no... they are going to be given as a present to someone who does not have birch trees at their cottage.
Now I started the process of drawing and designing pictures for the sauna bench towels.
This was the original picture that she wanted on the bench towels.
Here is the bench towel where I got the original copy from. I used these three pictures as a base to make my version for the new "sauna bench towels".
I drew four different pictures of each "knome". Below are a a few samples of the different drawing I drew for my customer.
I took the idea and tried different versions.
The customer liked them and was ready to order the bench towels.
However.. before I started making them I spoke with my teacher and she recommended that I make some bench towel drawings that are more my taste and style, and present these drawings to the customer as well. That way she has a larger range of different styles to chose from.
I had spent so much time drawing and planning these knome pictures that to start designing and drawing something totally new and different was an exhausting thought.. and to be honest at this point I just wanted to make the ones the customer had requested originally.
So... now I had to start from scratch again. Fortunately my idea of different trees was still in my thoughts, so I decided to make a series of four different types of trees found here in Finland.
Below you will see my drawings of the my " woodland series"
This is the first picture I drew for my " woodland series" it is of birch tree trunks. I am an birch tree fanatic. I love the shape,and the colours of them. They make me feel at peace. So... of course they were going to be the very first trees I pick for this series.
This drawing is the second one in my "woodland series". I have always loved the red pine trees here in Finland, so I knew that these had to be in my series. I drew these free hand and without any sample picture, I just thought about how they looked and drew that.
This is my third drawing for the "woodland series". I have always loved sticks and branches, and have them in my home continually. So... of course I had to draw a picture of forest scrub.
For this last picture of my "woodland series" I wanted to have spruce trees. Unfortunately I could not get a spruce tree that I liked. I tried drawing many different shapes of spruces, but none of them suited the rest of the series. Finally... I found a sample of the type of spruce I wanted and started to draw. This is how they came out. I was so happy with the result.
I now have many more pictures to show my customer, while drawing the "woodland series" an idea came to mind about another series and I just had to draw these as well to present to my customer.
This series is called the " Canadian series".
The customer lives in Canada. Even though they are finnish and are building a finnish sauna, I thought that maybe they would want something Canadian in the sauna as well.
The famous " Canada goose".. was the first picture in my "Canadian series"
The next picture I chose for my " Canadian series" was the Arctic wolf.
My third picture in this series that is the " inuksuk" that can be found in the great white north..
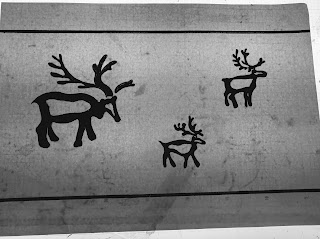
Finally my last drawing for the series just had to be the reindeer that roam the Northern hemisphere... both here in Finland and in Canada.
I was so excited to show my customer the drawings that she has to choose from. Let's see what she decides. I could hardly sleep because I was so anxious on which series she decides to pick. I really like the "woodland series".. it speaks to my heart and soul, but I also love the Canadian series. It was so totally unexpected, and I really didn't think I would love this series so much. It is probably because I am a Canadian as well. I can so relate to these pictures.
Well.... my customer decided and sent back the reply of which series I am to make the "sauna bench towels "from ... Can you guess which one she chose?
If you guess the " woodland series" you are correct. I have to say I was really surprised at that because I had suggested right from the beginning this series, but she said no. I guess once she had seen it she knew it would be perfect for the persons she was given them to.
So... anyways after this long explanation,we discussed and agreed on a price which included shipping to Canada.
Below you will see the steps involved in making these bench towels.
I first have to make a transparency of each tree picture. ( I will only show samples of one of these)
After making the transparency I put that on the screen and I used the technique of "light exposure" to print the pattern on the screen.
I do this expose to all four of my pictures. Then power wash off the exposed light and my screen is ready for use.
In this picture you can see I had printed my first picture on the linen towel.
Here is a picture of all four of the printed towels.
Completed "Woodland series" BIRCH bench towel.
Completed " woodland series" SPRUCE sauna bench towel.
Completed " woodland series" BRUSH sauna bench towel.
Last but not least the final " woodland series" PINE sauna bench towel.
I was so very very happy with how this series turned out. Also I am so happy that my teacher "encouraged" me to draw some designs of my own, for these bench towels.
Now those bench towels are completed I have to start drawing and planning the " sauna hats". These hats are traditionally made of felt, and used in the sauna to keep your head cool, which in turn keep your body at a cooler temperature in the sauna.
The sauna hat is used by many finns here in Finland, but the use of these hats is not so common in North American among the finnish popluation.
Well.. now I start my drawings.
This sauna hat's design matches the sauna bench towels. I chose a black base, and then drew trees in a beige colour.
In the drawing to your right, I drew a sauna hat with a beige base and then drew trees in black.
In this drawing I chose a beige base and black birch leaves as my design.
Here is a frontal view of the beige hat.
This hat has a black base and I used beige birch leaves as the design.
Here is a side view of the same black hat and birch leaves.
I submitted these drawing to my customer and they chose the Beige hat with the birch leaves for the female recipient and the black hat with the birch leaves for the male recipient.
Next I will show pictures of how I made the felted sauna hat.
In this picture I made the paper template of the hat. The template seems rather large, but when you start the felting process the felt shrinks and felts.
I have felted the hat to a stage where I can start adding the black felted decorations.
I changed the pattern a tad.. I added branches to the birch leaves.
I made the branches and then added the birch leaves in the black felt.
At this stage I put the hat on a head mold to start shaping the hat. The head mold makes it so much easier to make and mold the shape. I also let it dry on the mold.
Frontal view of the molding process.
I did the same process with the black hat. It is now drying the the head mold.
Here is a picture of the both the finished hats.
They turned out just how I had imagined.
Here is a picture of the finished Sauna hat. This hat is going to be given to a male recipient.
Here is a picture of the sauna hat for the female recipient.
My last step was to package and send the Sauna Bench towels, and the Sauna hats to my customer in Canada. This project was started on Sept 24,2020 and completed and sent on November 3 2020.
p.s. The recipients of these items were very PLEASED.... They absolutely LOVED THEM...


