Monday, August 31, 2020

RIBBONS WEAVING/ ROPE BRAIDING /TUFTING TECHNIQUES..

In the next few weeks we have the opportunity to chose different weaving techniques such a "card weaving, rope braiding, tufting. etc.... I mentioned rope braiding but unfortunately I forgot to take pictures of the different rope knots and braids that we learned.

I chose to do shuttle weaving first. I figured it was the easiest weaving to learn first.

My first" woven ribbon" is not something I could use or sell, but it was a good opportunity to try a new craft.


In the picture to your right I am setting up the small loom.


Here you can see how the process works. I tie both ends of the strings to something that does not move, and that way the strings stay tight so I can weave on it.


Here you can see a close up the the woven ribbon


I chose "card weaving" as my second ribbon technique. This one was more difficult for me to learn. I kept turning the cards in the wrong direction.


Here is a good example of the mess I am making with the card weaving. There is supposed to be a pattern, but unfortunately it really is a hit and miss on the pattern.


Here is a close up view of my card weaving. My pattern is constantly changing. I don't think it is supposed to be like that.


Here is a picture of my weaving attempts. I showed only the parts of the ribbons that worked out.


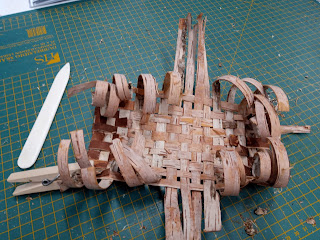
I decided to try basket weaving for my third technique. Unfortunately I did not have fresh birch bark for this attempt. I first soaked the bark in hot water overnight to make it more pliable to work with.


In this photo to your right you can see that my bark is drying up and curling which made it really difficult to work with.


I did not have alot of birch bark to work with so I landed up making a small birch bark credit card holder.


Next I wove a basket out of recycled material. The material now has the look and texture of felt. This basket is kinda " blahhh".


Here is another weaving technique I tried. You use a crochet hook which has a needle eye on the other end. This method can be called " latch hook" weaving.


This is the last technique that I tried. It is also called " latch hooking".. I really enjoyed making this picture. Once I got the hang of how the hook worked the picture came about very quickly. 


My last technique that I tried was " latch hooking " . In this picture  below you can see the picture that I am going to make on my fabric in latch hooking. The red picture is showing the colours I am going to use in this technique.


To the left you can see the red pattern appearing. Once I learned how to use the latch hook machine it became very quick and easy to make my picture. 

The only thing I was not prepared for was the amount of wool it took to make this project.


To your right is the finished project. I was really happy with how it turned out.


Here the pillow is on our couch. I will put this pillow out for the Christmas season. 


Thursday, August 27, 2020

DAY TRIP TO CRAFT BOUTIQUE


I and a few of my classmates had a wonderful opportunity offered to us. Our teacher asked us students if anyone was interested in spending a day at a Taide shop.. We would have to opportunity to ask the owner  questions about owning and running a business here in Finland. We would also have the opportunity to have a workshop creating and making an item for ourselves from her supplies at her store.

 What a golden opportunity this would be. So... off we went with a car full of women. We spent the morning going through her shop, and seeing what she sold there. Most of the crafts she her partner or her mother had made. They had a whole workshop set up for printing fabrics, weaving, felting, etc. 

She also spent alot of time telling us how she started up her shop and the difficulties that came her way, and how she overcame them. We also had a chance to ask her alot of questions about setting up a business etc. 

In the afternoon we got to work on our own projects... She gave us boxes full of materials to work with, which where full of wonderful colours and wool that I had never worked with.. I knew that I wanted to try these materials so I decided to make a felted picture.  


I am not a huge blue fan, but I just had to try these wonderful metallic blues that she gave us to work with. I used them as my background sky for this birch grove picture.


        In the picture below you can see closer the colours used. 

 Even though these are not my most favorite colours, I have grown to love this piece. Now... I just need to find the right place to display it.


It was a wonderful day that I spent with friends and classmates. It was also a really good learning experience for us all. 

Kiitos ihanasta päivästä Villakammari...

Monday, August 24, 2020

MACHINE/HAND EMBROIDERY


Our classes on embroidery continue. This week we will be taught different machine embroidery techniques. The first technique I wanted to try was " water soluble film embroidery". In the pictures below you can see this technique.

 The beige leaf sample was my first attempt at this technique. It was actually quite fun.


I also did just plain machine embroidery, which was a lot of fun. Here are a few sample pieces that I made.

                    In the above picture you can see the sample pieces of machine embroidery.


In this picture I machine embroidered using both of the techniques I learned. You can see in the taller stalks of wheat the water soluble technique used. It shows white through the picture but that is only the white table your seeing through the wheat. I was very pleased with the end result of my first attempts of machine embroidery.


I also tried the machine embroidery on a felted picture that I had made earlier on in the year. I had never been quite happy with this felted picture, so I thought that the machine embroidery might improve this picture. It truly did. The grasses now seem to pop out of the picture. 

Now.... all I have to do is buy a sewing machine that does embroidery....


HAND EMBROIDERY

Our second year of school has begun. After being homeschooling since March  ( due to Corona Virus) it felt surreal to be at school again. So, anyways...this fall we began our schooling with hand embroidery techniques. 


I loved embroidery this wheat design. It is so simple yet so lovely. It's funny that I have never really done any embroidery on my clothes.


Here is a fun way to cover up holes, and patches in your jeans. 

These are 2-3 day courses that we get to try our hand at these different techniques.